
Introduction react todo list
In this tutorial I am going to cover how to create react todo list app with few very easy steps. In other words react js hello world app. Everything you may need will cover from A to Z with react js examples . Here I am using ES6 syntax which make your code easy to read and write.
If you have no idea about creating react web application, today I am going to cover basic this you may need to create simple react web application, that you can scale up to complex react application without any burden. Learn how to create react application in development mode and once finish deploy your application in production environment.
Reactjs todo application example
This is an very simple react todo app demo created using bootstrap.Enable Javascript to run this example Download Source Code

Step 1: Setup react starter kit
Before we begin we have to setup react starter kit. download react starter kit from below link. After downloading the starter kit continue reading this articke if you don’t know how to run the starter kit.
Refer this article to create your own react starter kit Learn how to create your own react starter kit
Using the terminal go to download folder where you can see package.json file (contains required packages). From there enter below commands to run the application.
npm i
npm start
Then using browser go to http://localhost:3000 . Congratulations you just setup development environment for our react application.
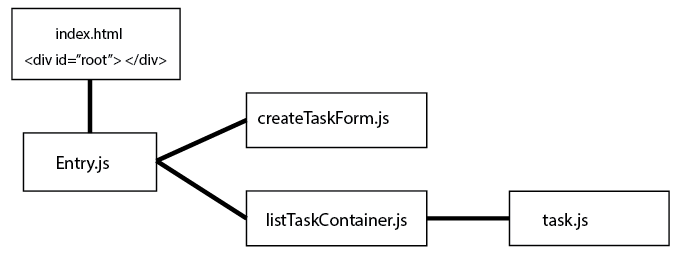
Step 2: Creating basic component structure of our application
Below picture shows basic react component structure that can be used to create our react todo application
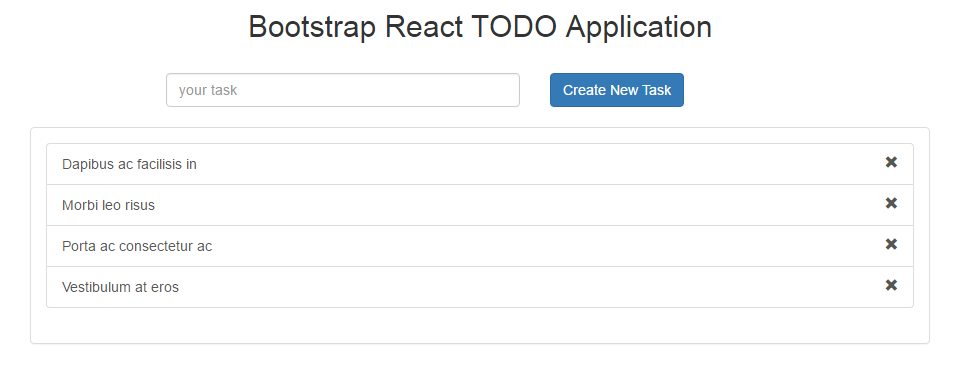
Step 3: Designing basic HTML and CSS for our react application.
Once you download and run above react starter kit you will see some text like “My React Application” in your browser. Using bootstrap I created a simple todo layout. Copy and replace MainContainer class with with below give class.
class MainContainer extends React.Component{
	render(){
		return(
    <div>
        <div className = "row">
            <div className="col-md-12">
                <div style = {{textAlign:"center"}}>
                    <h2> Bootstrap React TODO Application </h2>
                </div>
            </div>
        </div>
        <div className = "row">
            <div className = "col-md-6 col-md-offset-3">
                <div style = {{margin:"20px"}}>
                    <div className="row">
                            <div className="col-md-7">
                                <input type="text" className="form-control" placeholder="your task"/>
                            </div>
                            <div className="col-md-4">
                                <button className="btn btn-primary"> Create New Task </button>
                            </div>
                    </div>
                </div>
            </div>
        </div>
            <div className="row">
                <div className = "col-md-8 col-md-offset-2">
                    <div className="panel panel-default">
                        <div className="panel-body">
                        <div className="list-group">
                            <a href="#" className="list-group-item">Dapibus ac facilisis in <i style = {{float:"right"}} className="glyphicon glyphicon-remove"> </i></a>
                            <a href="#" className="list-group-item">Morbi leo risus <i style = {{float:"right"}} className="glyphicon glyphicon-remove"> </i></a>
                            <a href="#" className="list-group-item">Porta ac consectetur ac <i style = {{float:"right"}} className="glyphicon glyphicon-remove"> </i></a>
                            <a href="#" className="list-group-item">Vestibulum at eros <i style = {{float:"right"}} className="glyphicon glyphicon-remove"> </i></a>
                            </div>
                        </div>
                    </div>
                </div>
            </div>
        </div>
			)
	}
}
Open your browser and you will see something similar to below picture
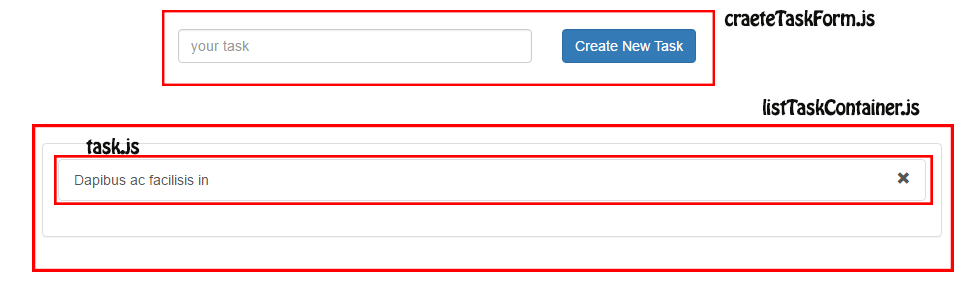
This is how above interface is broken down into react components as show in step 2
Step 4: Separating into react components.
create following files in following locations
# src/components/createTaskForm.js# src/components/task.js
# src/containers/listTaskContainer.js
Using the diagram shown in step 3, you will now understand what component goes inside each file. So let’s add html to those files. Since we are using ES6 syntax it will easier for you to read each line of code.
Below shows how above HTML is separated into files. Please note that each created components are linked to entry.js either directly or indirectly (via another file). After copy and pasting below codes you will see static output (CSS only structure) in your browser without any functionality.
Note: Every time when you use react component first letter of the react component should be in capital,Ex: import Task from “../components/task.js”.
If not it will be treated as a basic html component.
# src/components/createTaskForm.js
import React, {Component} from "react"
export default class CreateTaskForm extends Component{
  constructor(props){
    super(props)
  }
  render(){
    return(
      <div className = "row">
        <div className = "col-md-6 col-md-offset-3">
            <div style = {{margin:"20px"}}>
                <div className="row">
                    <div className="col-md-7">
                        <input type="text" className="form-control" placeholder="your task"/>
                    </div>
                    <div className="col-md-4">
                        <button className="btn btn-primary"> Create New Task </button>
                    </div>
                </div>
            </div>
        </div>
    </div>
    )
  }
}
# src/components/task.js
import React, {Component} from "react"
export default class Task extends Component{
  constructor(props) {
    super(props)
  }
  render(){
    return(
        <a href="#" className="list-group-item">Dapibus ac facilisis in
            <i style = {{float:"right"}} className="glyphicon glyphicon-remove"></i>
        </a>
    )
  }
}
# src/containers/listTaskContainer.js
import React, {Component} from "react"
//Components
import Task from "../components/task.js"
export default class ListTaskContainer extends Component{
  constructor(props) {
    super(props)
  }
  render(){
    return(
      <div className="row">
        <div className = "col-md-8 col-md-offset-2">
            <div className="panel panel-default">
              <div className="panel-body">
              <div className="list-group">
                <Task/>
                </div>
              </div>
          </div>
        </div>
      </div>
    )
  }
}
# entry.js
import React from "react"
import {render} from "react-dom"
//Components
import ListTaskContainer from "./containers/listTaskContainer.js"
import CreateTaskForm from "./components/createTaskForm.js"
class MainContainer extends React.Component{
	constructor(props){
		super(props)
	}
	render(){
		return(
                    <div>
                        <div className = "row">
                            <div className="col-md-12">
                                <div style = {{textAlign:"center"}}>
                                    <h2> Bootstrap React TODO Application </h2>
                                </div>
                            </div>
                        </div>
                        {/*Create Task Form */}
                        <CreateTaskForm/>
                        {/* Show Task list */}
                        <ListTaskContainer/>
                    </div>
			)
	}
}
render(
	<MainContainer/>
	,
	document.getElementById("root")
	)
Step 5: Listing created tasks.
What is done here is;When we provide an array of tasks to taskListContainer it will show list of tasks and when we click on close button that task will be removed Note:
Data pass from component to component is by using props. Data managed inside a component is using states. Props or data received using props are immutable (constants or cannot change). states are mutable.
# src/components/task.js
import React, {Component} from "react"
export default class Task extends Component{
  constructor(props) {
    super(props)
    this.handleCloseTask = this.handleCloseTask.bind(this)
  }
  static propTypes = {
    id: React.PropTypes.number.isRequired, //Define that id of type int is needed when you use this component
    name: React.PropTypes.string.isRequired, //Define that name of type string is needed when you use this component
    onClose: React.PropTypes.func.isRequired,//Define that onClose function is needed when you use this component
  }
  render(){
    return(
      <a href="#" className="list-group-item">
        {this.props.name}
        <button onClick = {this.handleCloseTask} style = {{float:"right"}}>
          <i className="glyphicon glyphicon-remove"> </i>
        </button>
      </a>
    )
  }
  handleCloseTask(){
    this.props.onClose(this.props.id)
  }
}
Here task component is changed to accept name prop in order to display task. prop id isused to track each task seperately. onClose function is used to tell that user click on
task close button. We are sending task id on task close.
# src/containers/listTaskContainer.js
import React, {Component} from "react"
//Components
import Task from "../components/task.js"
export default class ListTaskContainer extends Component{
  constructor(props) {
    super(props)
    this.handleCloseTask = this.handleCloseTask.bind(this)
  }
  static propTypes = {
      list:React.PropTypes.array.isRequired, //Define that list of array is needed when you use this component
      removeTask: React.PropTypes.func.isRequired
  }
  render(){
    return(
      <div className="row">
        <div className = "col-md-8 col-md-offset-2">
            <div className="panel panel-default">
              <div className="panel-body">
              <div className="list-group">
                {
                  this.props.list.map((value, index) => (
                      <Task
                        key = {index}
                        id = {index}
                        name = {value}
                        onClose = {this.handleCloseTask}
                      />
                  ))
                }
                </div>
              </div>
          </div>
        </div>
      </div>
    )
  }
  handleCloseTask(id){
    this.props.removeTask(id)
  }
}
Here we are accepting a prop “list”. It is an array that is used to display tasks.removeTask() function is called immediately after onClose() function, which is called from
task component.
# entry.js
import React from "react"
import {render} from "react-dom"
//Components
import ListTaskContainer from "./containers/listTaskContainer.js"
import CreateTaskForm from "./components/createTaskForm.js"
class MainContainer extends React.Component{
	constructor(props){
		super(props)
		this.state = {
			taskList:[]
			}
			this.handleRemoveTask = this.handleRemoveTask.bind(this)
	}
	componentDidMount(){
		this.setState({
			taskList:["Task 1", "Task 2", "Task 3"]
		})
	}
	render(){
		return(
                    <div>
                        <div className = "row">
                            <div className="col-md-12">
                                <div style = {{textAlign:"center"}}>
                                    <h2> Bootstrap React TODO Application </h2>
                                </div>
                            </div>
                        </div>
                        {/*Create Task Form */}
                        <CreateTaskForm/>
                        {/* Show Task list */}
                        <ListTaskContainer
                            list = {this.state.taskList}
                            removeTask = {this.handleRemoveTask}
                        />
                    </div>
			)
	}
	handleRemoveTask(id){
            let array = this.state.taskList;
            /* Remove selected value from array */
            array = array.filter(function (el, index) {
                     return index !== id
            });
            this.setState({taskList: array});
	}
}
render(
	<MainContainer/>
	,
	document.getElementById("root")
	)
Here we just passed an custom created array to listTaskContainer and add new function to filter array based on it’s id (handleRemoveTask()) . When you go through the code you will see that taskList is the array that is going to be change and it is assign to component state. When final created array is added to state, it is passed to listTaskContainer component as a prop.
componentDidMount() function is react based function which is triggered after component is mounted.Here is the list of some important react life cycle functions.
componentWillMount(){
//Triggered before component get mounted
}
componentDidMount(){
//Triggred after component get mounted
}
componentWillUnmount(){
//triggered when component unmount
}
componentWillReceiveProps(nextProps){
//triggred when component receive props after mounting.
}
Step 6: Create tasks and viewing them
# src/components/createTaskForm.js
import React, {Component} from "react"
export default class CreateTaskForm extends Component{
  constructor(props){
    super(props)
    this.state = {
      taskName:""
    }
    this.handleAddTask = this.handleAddTask.bind(this)
  }
  static proptypes = {
    newTask: React.PropTypes.func.isRequired
  }
  render(){
    return(
        <div className = "row">
            <div className = "col-md-6 col-md-offset-3">
                <div style = {{margin:"20px"}}>
                    <div className="row">
                        <div className="col-md-7">
                            <input
                                type="text"
                                className="form-control"
                                placeholder="your task"
                                onChange = {e => this.updateTaskName(e)}
                                value = {this.state.taskName}
                                onKeyPress = {e => this.checkEnterKey(e)}
                              />
                        </div>
                        <div className="col-md-4">
                            <button type = "button" className="btn btn-primary" onClick = {this.handleAddTask}> Create New Task </button>
                        </div>
                    </div>
                </div>
            </div>
    </div>
    )
  }
  checkEnterKey(e){
    var keyCode = e.which || e.keyCode;
    if(keyCode == 13){
      if(this.state.taskName.trim() !== ""){
          this.props.newTask(this.state.taskName)
      }
    }
  }
  updateTaskName(e){
    this.setState({taskName: e.target.value})
  }
  handleAddTask(e){
    let name = e.target.value
    if(this.state.taskName.trim() !== "")
      this.props.newTask(this.state.taskName)
  }
}
Here we are triggering function newTask() through props when we press enter key or press the create button.With that function we are sending name of the task that user entered. That’s all. For those who are new to react, the other functions like updateTaskName() function will update component state with user entered data as user start to type. checkEnterKey() function is used to detect user pressed the enter key in input field.
# entry.js
***
   ............
***
        constructor(props){
            super(props)
            this.state = {
                taskList:[]
                }
            this.handleRemoveTask = this.handleRemoveTask.bind(this)
            this.handleAddTask = this.handleAddTask.bind(this)
	}
***
   ............
***
        render(){
            return(
                <div>
                    <div className = "row">
                        <div className="col-md-12">
                            <div style = {{textAlign:"center"}}>
                                            <h2> Bootstrap React TODO Application </h2>
                            </div>
                        </div>
                    </div>
                    {/*Create Task Form */}
                    <CreateTaskForm
                            newTask = {this.handleAddTask}
                    />
                    {/* Show Task list */}
                    <ListTaskContainer
                            list = {this.state.taskList}
                            removeTask = {this.handleRemoveTask}
                    />
            </div>
            )
	}
***
   ............
***
	handleAddTask(name){
		let tmp = this.state.taskList;
		tmp.push(name);
		this.setState({taskList: tmp})
	}
***
   ............
***
When user add new task the newTask() function on createTaskForm component is triggered andthat is handle by handleAddTask() function. In that function we push newly created task into task array and re render the component in order to show newly added task. Re render occure when component’s state changed.
Download react todo web application
Help: Using the terminal go to download folder where you can see package.json file. From there enter below commands to run the application and then using browser go to http://localhost:3000 to see working react todo application.
npm i
npm start